I Made a Photography Zine!

My first zine, This South I’ve Known, lying among debris.
Introduction
Well this is a breath of fresh air! I didn’t expect to find myself putting together a zine at midnight last Wednesday, but fate seemingly led me there. I was talking with some folks over Discord while working my day job, when we got onto the subject of making zines. Em Zullo in particular suggested putting together a photography zine, which was enough of a push to occupy me for the rest of the day and on into the wee hours of the night.
Before I jump into the process, I wanted to quickly touch on what a zine actually is (when I was initially telling some of my friends about this little project, I got quite a few blank stares). For lack of a robust explanation, a zine is a homemade magazine. However, the definition of “magazine” here is very loose; zines are made with many different types of materials, are bound in many different ways, and come in all different shapes and sizes! Historically, zines have been a medium for conveying counter-cultural messages and for uplifting oppressed and under-represented voices. However, a zine doesn’t have to fall into that bucket to be considered a zine; folks nowadays have taken to making zines about their hobbies, everyday lives, and much more! There are even entire zine fests dedicated to selling and trading zines. There’s a very rich history behind the production and distribution of zines, and I’d highly recommend reading up on it (you can start at Wikipedia!).
Where Do I Start?
That was my first thought when I decided to dedicate some time to this. I knew that I wanted to make the zine about the American South and industry, a topic I had explored in a recent final project for a photography class. However, how to make that a physical thing was a bit foreign. So, I started thinking about some of the work I’d seen my friend Lu Horrorhare do to prepare his comic Penske Chronicles (it’s not out yet so I can’t link to anything, go to his Twitter and pummel him with rocks until he releases it). I suppose I sort of worked backwards from what he was doing; in his case, he created each page of the comic first with a rough idea of layout, then went through layout hell once all the pages were finalized. To quote him: “its weird bc i both was thinking and also not thinking”.
Unlike Lu, I like to think1. So, I wanted to pre-plan the zine layout so I could build it with a final design in mind. I made a little mental list of things that I knew I wanted the zine to be:
- Topic: Photography of industry and byproducts in the American South
- Format: Opens and reads similar to a standard magazine; saddle stitched (stapled)
- Size: All pages to be cut from a single piece of US letter paper (8.5" x 11"), I wanted to keep it simple and not have to deal with multiple pages
- Orientation: Vertical; I don’t have a saddle stitch stapler and the furthest my current stapler can reach is ~3 inches
Prototyping
The first prototype of the zine, used to figure out page number layouts for the digital prototype.
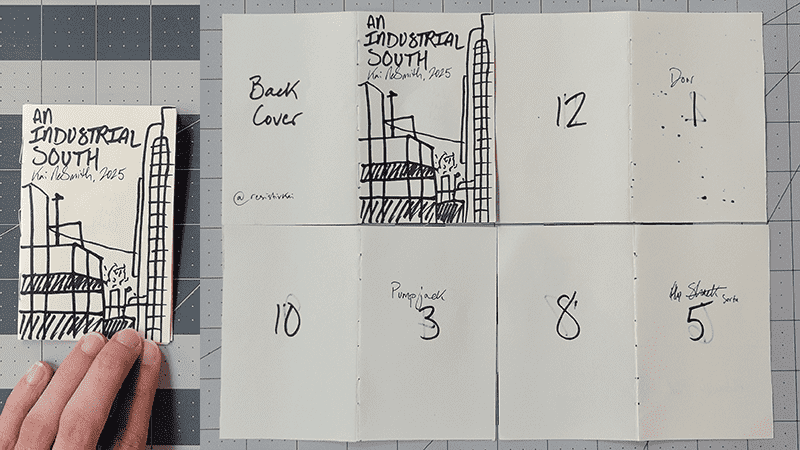
With the basic attributes in mind, it was time to make some prototypes! I watched a couple videos on zine making and looked around for some templates (Wuthipol Ujathammarat has made some great examples!), and noticed most were for folded zines where all the pages are connected. However, since I wanted a saddle stitch stapled zine, the page numbers in those templates weren’t where I needed them to be. So, I grabbed a piece of paper and cut it down into fourths, then folded each one vertically to make it a page spread. I stapled all the spreads together in the middle, then labeled each page accordingly, before taking it back apart to re-assemble it as a single page. What I was left with was a template that I could then reference to make a digital template, which would be easy to work from.
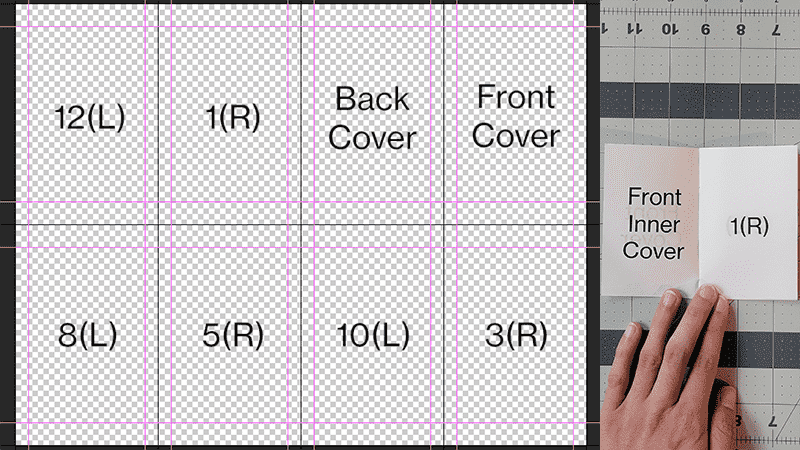
The second prototype of the zine, a digital template with a physical test print to make sure everything was properly in place.
After a long while of fiddling with Photoshop’s guides, I was able to put together a template that would allow me to create a double-sided PDF for printing, where each page would be aligned. To help me choose how to sequence the photos, I also marked which pages are left and right (in hindsight, I could’ve just looked at evens vs. odds, but I’m forgetful so this helped me). I did a quick test print, cut it down, and stapled it to double-check that everything lined up well and that no pages were out of order. Luckily, I got it on the first try!
You can grab the template here if you want to try it for yourself: ZineLayout_2-3RatioPhotos.zip (heads up that it extracts to ~256 MB since the canvas is large). I specifically designed the template for 2:3 aspect ratio photos since that’s what I typically shoot, but you can adjust the magenta guides to accommodate for a different aspect ratio. If you print using this template, flip along the short side and keep in mind that this is made for US letter paper.
Okay, Make the Thing Already
Alright, so I had a nice template to work from, I knew that my pages would line up when printed, now I just needed to make the thing! I started by laying out the candidate photos that I might want to include in the zine. I originally planned to pull from selections for my photography class final project, but I ended up pulling a lot more photos from after I graduated. While looking through everything, I found the artist’s statement I wrote for the final project, which I tidied up and incorporated into the zine to help drive the narrative. In fact, writing in the text came before placing any photos into the project; I’ve found that having a concept fresh in my mind helps to drive me towards stronger creative decisions!
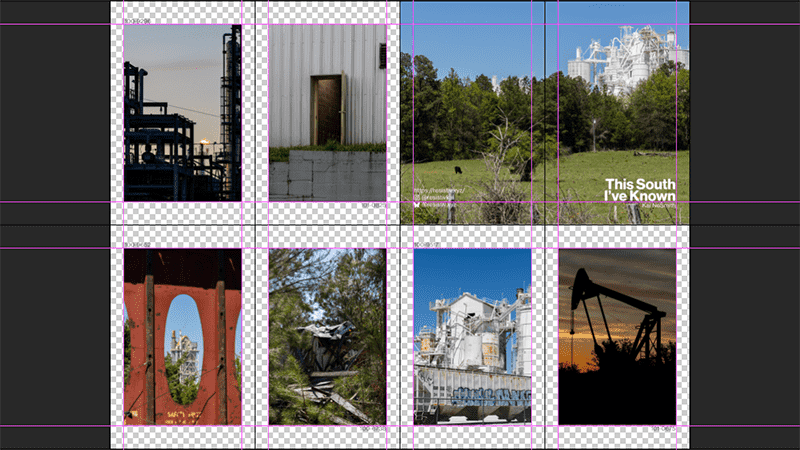
One side of the zine pages, laid out in the template.
One downside of designing the zine like this was while I knew what pages on the sheet would physically go next to one another, I couldn’t directly see the sequencing outside of some careful spacial reasoning (quick! rotate an apple in your mind!). However, it eased a lot of the pain that would have come along with figuring out the layout later, so I think it was worth it. I’ll likely print some little thumbnail photos that I can cut up and physically position next time, though!
Now that I actually had everything laid out, I exported the two different sides of the sheets as PDFs, combined them, and made a test print at home. I have an older inkjet printer and some plain white paper stock that I normally use to print documents, so I figured I would give it a try. I definitely was not satisfied with the results; there was lots of ink bleeding since the paper was relatively thin, alongside bad color reproduction and DPI. With this in mind, I decided to get a small batch made from Office Depot, since they offered solid printing and a quick turnaround. I got 15 sheets printed, and used up 2 making some final prototypes.
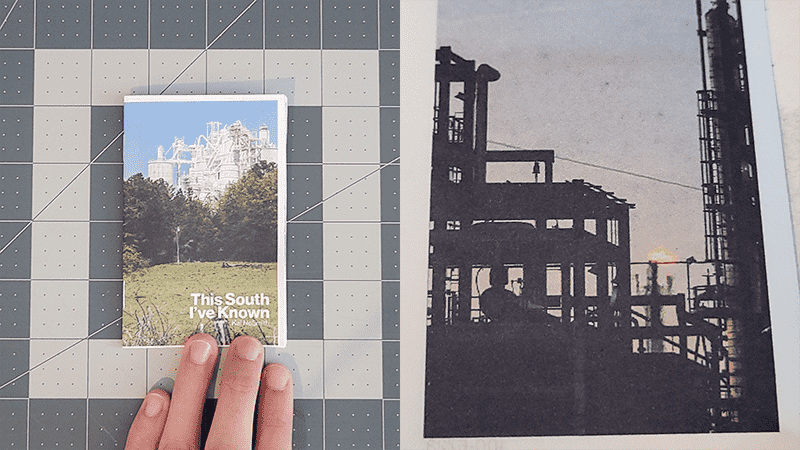
The third prototype of the zine, with poor color reproduction and a little bit of ink bleeding from page-to-page.
The reason I needed to make these “final” prototypes was because the printing didn’t actually go as expected; it seems like Office Depot enforces a margin on document prints, so there was a slight white border that caused everything to need to be trimmed, re-adjusted, stapled, then re-trimmed in order to align all the pages properly. This extended the time to produce a zine much longer than I initially expected, considering I thought I would only be making 3 cuts and then stapling. However, I’m still very happy with the end result, and got 13 good copies out of it!
If you’re curious and would like to order a either a physical or digital copy, they are available now over at my Ko-fi shop! Buying a copy helps me to be able to make more zines and cool printed stuff in the future; I’ve already got some neat ideas of what I want to do next!! Hope you enjoyed reading this article and learning a little on how it was made, and I hope you make a zine about something in your life too, it’s a lot of fun!!
- Kai :)
This is a lie. ↩︎